

How to do a back handspring?
- Fly Cheer Gear
- Oct 11, 2018
- 4 min read

Want to know an efficient, progressive, and functionally correct technique for a standing back handspring? This week we will focus on the body positions in a standing back handspring.
We have to thank David Patton for helping us out with this project. We felt the need to bring an expert like him on board to help us out with breaking down the technique. A project that started as a blog post ended up a lot bigger than we expected; we now are offering a poster that gym owners, coahes or athletes can buy for the gym or home to have a detailed explanation of every body position with images to help them master this skill. You can buy a poster HERE.

In a standing back handspring we use the 3 main body positions (long arch, neutral, and hollow), and a position specific to any skill that does not have a step or a run before it, an athletic stance, to explain the movement of the body through a standing back handspring.

#1 Standing with correct posture
In this position, the athlete’s shoulder blades are pulled down and back into their spine and their core is engaged. The head is neutral, sitting on the shelf of their body, where it will remain throughout the entire skill.
#2 Athletic stance
To get to this position, you will keep your arms by your side and slightly sit (to closed hips) until you get to what is known as an athletic stance. In the athletic stance, your shoulders will be slightly over your knees and your knees will be slightly over your toes so that you can load your glute and hamstring muscles. You will maintain good posture throughout! This loading of the glute and hamstring muscles will give you the desired power you need to be able to effectively extend through the following steps.
#3-#4 Fast arms
From the athletic stance, you will lift your arms while keeping your belly button pulled in and squeezing your shoulder blades together. The tension in the glute and hamstring muscles must be maintained; this means that you don’t squat lower than your sit for the athletic stance. There will be no further movement until your arms get to your ears.

#5-#6 Body Extension
After the arms get to the ears, you will then squeeze your glute muscles until your hips become flat. If this is done correctly, all the separate segments will come to the neutral position of number 7.
#7 Neutral Body or Postural Alignment
This neutral position is key for leaving the ground and delivering all the explosive energy that you built up in your athletic stance. In this position all joints are aligned. This alignment allows you to push though your entire body at once. Because there is no form break, the energy will travel all the way from the floor, through your feet, and then up throughout your entire body. If steps 1-7 were done correctly, you will be leaving the ground with some explosive power!

#8-#9 Bend, but don’t break - the Open body!
In position 8, you will simultaneously create a tight arch in your upper back (by squeezing the shoulder blades together and actively reaching back) and press your hips (by squeezing your glute muscles) even more. When doing this you must make sure that your belly button is pulled in so that no arch is created in the lower back - it must remain flat or have the most minimal movement through it as possible. By doing this, most of your body weight will be toward the center of your body, your hips. By extending through the hips in this position, you will create a nice lift that will be needed for later positions.

#10 Open body Weight Transfer
In position 10, you will contact the ground, in a tight open body position, through the palms of your hands. The weight that predominantly was in your hips will now be transferred to your upper back. You will do this by really engaging your rectus abdominis (6 pack muscles). If the extension through the upper back is strong and the hips remain flat, your belly muscles will pull the lower half of your body up and transfer most of the weight from your hips to your upper body. This will happen until your entire body gets back to being completely re-aligned.
#11 Handstand or Neutral body
In this position the weight of the body is completely distributed evenly throughout the entire line. Again, this alignment of the joints is necessary if you desire to push through your entire body at one time, maintaining all the power that was created up to this point. You will shrug up and extend through entire body as much as possible to max out the line’s strength.
#12 Closed or Hollow body position
To get to this position you will maintain flat arm pits and hips, but you will also exaggerate your engagement through the upper part of the core. By firing the rectus abdominis muscles the middle of the back becomes closed. As this is happening you are also pushing through your finger tips and shrugging through your shoulders (blocking) and leaving the ground in a closed or hollow body position.
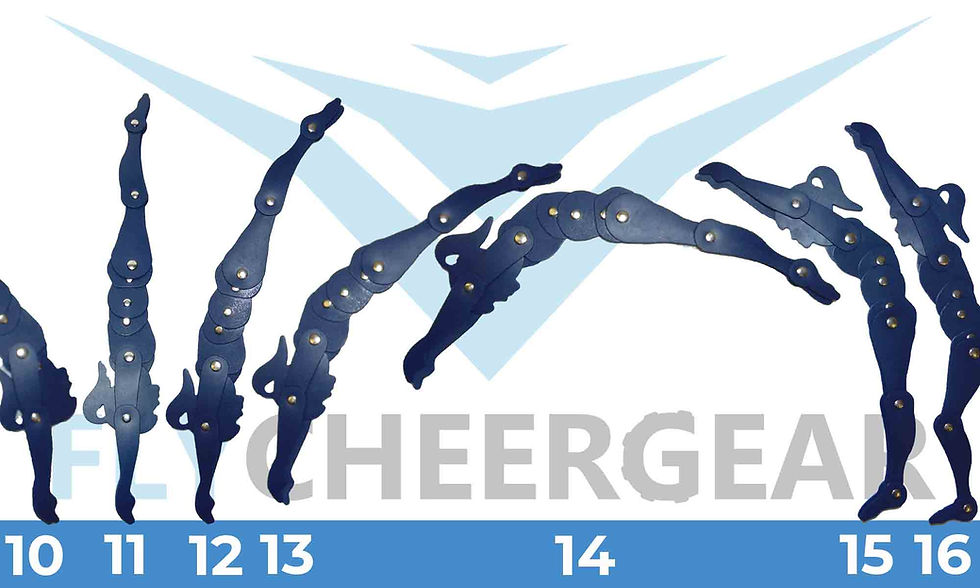
#13-14 The snap down
In this position there should be no pike; the hips remain open. This is a power movement that is found in almost all backward moving skills. In this position you will squeeze your glute muscles and pull your belly button in as you drive your arms to the ceiling. Same as in positions 8 and 9, but in the opposite sense, you will bend but you will not break. Mobility through the upper back in both directions is necessary!

#15 Contact with ground
In this position, your chest will be flying up and your feet will be landing directly under you with your toes making contact.
#16 Soft Knees
By landing through your toes in position 15, you will do no harm to your ankles or lower back, and you will create soft knees so that the forces may leave your body in a non-harmful way. You will be in an athletic stance with your arms by your ears.
#17 Good posture
To get to this position you will stand up and drop the arms (clean) and return to your original starting position.
Stay tuned for more skills and drills! Also feel free to leave a comment.
Fly Cheer Gear and David Patton


This is a very informative blog highlighting the importance of timely addiction treatment. Choosing a professional Cocaine Addiction Treatment Center in Delhi can make a significant difference in recovery outcomes. With medical detox, therapy, and relapse prevention support, individuals get the structured care they truly need. Awareness and early intervention are key to long-term healing. Thank you for sharing such valuable insights that can help families make informed decisions and support their loved ones toward a healthier, drug-free life.
Great and informative post Addiction recovery is a sensitive journey, and choosing the right support system makes a big difference. A Marijuana Addiction Treatment Center in Delhi plays an important role by offering structured detox, therapy, and long-term rehabilitation under expert supervision. Professional care, a positive environment, and personalized treatment plans really help individuals regain control of their lives. Articles like this spread awareness and encourage people to seek timely help without stigma. Thanks for sharing such valuable insights on recovery and mental wellness. If you or a loved one needs support, call +91-9718921212 today for confidential addiction care and guidance.
e2bet là sân chơi giải trí hiện đại, quy tụ hàng loạt trò chơi hấp dẫn, từ cá cược thể thao đến game bài kinh điển. Với công nghệ vượt trội tại e2betclb com, người chơi tận hưởng tốc độ giao dịch nhanh, an toàn tuyệt đối và cơ hội nhận thưởng cực lớn.
Gia nhập KJC, bạn được trải nghiệm sân chơi vận hành bởi công nghệ tiên tiến, thanh toán linh hoạt và ưu đãi khủng mỗi ngày. Nền tảng kjc lgbt cam kết minh bạch và an toàn cho mọi game thủ. Truy cập trang chính thức để tham gia tại https://kjc.lgbt/
Thanks for the post and great tips..even I also think that hard work is the most important aspect of getting success. screens op maat